Monday, January 04, 2016

RBox - Remotely Deployed GSM SIM Management


As I discussed earlier in my previous post, one of the use cases of RBox is for management of remotely deployed GSM-sim card for sending/receiving sms. You might wonder why would someone deploy their Sim card in a remote location rather than inserting it in a phone and keeping it close to your body. Well, there are many reasons why remotely deployed sim card would make sense, so far I could think of following reasons(do let me know in comments section if there are other use cases).

  1. When on international travel, your sim-card may not have roaming feature enabled.
  2. You might be located outside gsm coverage area, but you are in need of sms send/receive functionality.
  3. You may have multiple sim cards, but want to access them from centralized location.
  4. You might want to setup your own sms-gateway for sending/receiving sms over internet.
  5. You might have remotely deployed sensors sending the data via sms, and you want to collect all sms data from a central gateway.

There might be many other reasons why someone would deploy their SIM card remotely, but whatever you decide to do with this kind of setup, ensure that your SIM card is deployed at a safe and secure location to avoid possible misuse.

In simple words, this solution allows you to keep your SIM card connected to the internet and you can access it from your xmpp-client(or google-hangout) using your handheld mobile device.

You need following items to prepare this setup:

  1. SDCard image(download it from here, RBox is an open source project hosted on github
  2. Raspberry pi B or B+
  3. Micro or full size SDCard
  4. Huawei E173 USB 3G stick
  5. Sim card(ensure that SIM is not locked with pin)
  6. 5V/2A power supply.
  7. Two google(or jabber) accounts(one for you, second for your raspi)
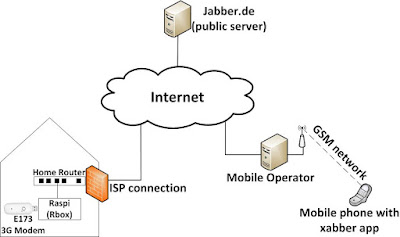
 

Solution shown above, uses Huawei e173 USB 3G Modem connected to your Raspberry pi B+ and further on Raspi is connected to internet via home router. Here you can find the details about preparing the SDCard. If everything goes well, you shall see raspi being online on your android xabber app(or on your google-hangout). Send "Help" chat message and the raspi will reply will list of supported commands.

You will notice that when RBox is booted without USB-3G-stick, sms/sim related commands from the "Help" list will be missing because of missing USB-3G-stick hardware.

Before switching on the setup, ensure that password-unlocked SIM card is inserted into USB-3G-stick and a 2Amp capable 5V power supply shall be used.

Note: Ensure that both the google(or jabber) accounts are known to each other by authorizing the contact, you have to do this separately on your PC before switching ON the raspi.

How to read SMS?

  1. Send "Smsupdate"
  2. Immediate reply "InProgress : taskID=1" will be received
  3. nothing happens for 3-to-5seconds(dont panic, just wait)
  4. If everything goes well, reply "Success : taskID=1" will be received, else "Fail : taskID=1".
  5. Send "Smstotal"
  6. reply will look like: "Success : 2" this means total 2 messages are read from sim to cache
  7. send "Smsget 0" to read first message, or "Smsget 1" to read second message.


How to delete all SMS?

  1. Send "Smsdeleteall"
  2. Immediate reply "InProgress : taskID=2" will be received
  3. nothing happens for 3-to-5seconds(dont panic, just wait)
  4. If everything goes well, reply "Success : taskID=2" will be received, else "Fail : taskID=2"
  5. To know if all messages are delete, follow the steps above in section "How to read SMS"
  6. If you notice there are still undeleted messages, Repeat the step 1 to 4(hopefully in future version of RBox this problem will be fixed).

How to send SMS?

  1. Send "Smssend 009198xxxxxxxx hello this is a test message"
  2. Immediate reply "InProgress : taskID=3" will be received
  3. nothing happens for 3-to-5seconds(dont panic, just wait)
  4. If everything goes well, reply "Success : taskID=3" will be received, else "Fail : taskID=3"
  5. If you notice sms was not sent, just skip "0091" international+country code and try again.

How to do voice dialling?

  1. Send "Dialvoice 009198xxxxxxxx"
  2. Immediate reply "InProgress : taskID=4" will be received
  3. nothing happens for 20 to 25seconds(dont panic, just wait, dialling might be in progress)
  4. Call ringing will happen for 20 to 25seconds, if caller picks the call, then he will hear nothing
  5. After 25seconds call will be disconnected automatically and reply "Success : taskID=4" will be received.
  6. As of now, there is no specific use of this blank call, but future RBox release would include auto playback of recorded message to notify certain events for automation use case.

How to Dial USSD codes like *101#(useful for knowing balance amount of prepaid SIM)?

  1. Send "Dialussd *101#" (this number may vary depending on the provider)
  2. Immediate reply "InProgress : taskID=5" will be received
  3. nothing happens for 3-to-5seconds(dont panic, just wait)
  4. If everything goes well, reply "Success : taskID=5" will be received, else "Fail : taskID=5"
  5. Send "Readussd" to know the return text of last ussd-dial.

RBox - Home Automation

As I discussed earlier in my previous post, one of use cases of RBox is for home-automation to controll the devices of your home network from any remote location. As long as your phone is connected to internet via 3G-Data or wifi, you can send/receive commands to Home-RBox  from xmpp client of your handheld device.

The advantages of this setup is, you dont need tweaking of any settings of home router, you can secure your home network by blocking all the incoming ports of the firewall, and there is no need to depend on any paid cloud services, you can find tons of free Xmpp/Jabber servers hosted on the public internet, this way you can achieve secure and easy connection between two devices on the internet.


As shown above, Raspi h/w at home is running RBox linux distribution, and your handheld device on the public internet is running xabber android app. Both raspi and android-xabber have logged in to jabber.de with their own username and password, and these two devices have already authorized each other(as per the instructions given here) to send/receive chat messages .

In order to control the GPIO2 pin of the raspberry, send following command on your android-xabber, "Gpio 2 0" or "Gpio 2 1" for toggling the GPIO2 of Raspberry Pi.

For details on the preparation of this setup, refer to my previous blog where all the details of RBox installation on Raspberry Pi is given.

Sunday, January 03, 2016

RBox - Xmpp Command List and Help

With reference to my previous post regarding RBox, Here is the detailed information on all available commands supported by RBox. For a full list of available commands, send "Help" command to RBox slave and it will reply with the list as shown below.


Note: Commands are not case-sensitive, internally they are always converted to lowercase before processing, so you dont have to worry about typing upper or lowercase characters.

"Version"

This command takes no arguments, It returns the version number of RBox in the following format,
MJ.Mn.BUILD
MJ is the Major version(e.g 00,01,02)
Mn is the Minor version(e.g 00,01,10,20)
BUILD is the 5 digit svn version number(using this number you can always re-create the same binary).
Hint: Run this command before and after running "Sysupdate" command, this way you will know current version number and updated version number or RBox.


"Sysupdate"
This command takes no arguments. It is used for updating the RBox version to latest available release in github. If you trigger this on already updated version, still it will update the non-active boot section and during next reboot, it will boot with last updated boot section. After Sysupdate, reboot is necessary for updates to take effect.
Hint: you can concatenate "Sysupdate;reboot" so that after update is done, reboot is triggered automatically.


"Reboot"
This command takes no arguments, Internally its a linux "reboot" command which initiates closure and logout of all services for a gracious shutdown and restarts.


"Poweroff"
This command takes no arguments, Internally its a linux "poweroff" command which initiates gracious shutdown and keeps the system in halt condition. Its an important command to be used whenever you plan switch off the power of RBox, Dont just hard-cut the power, it will confuse you by showing the Rbox still online but non-responsive, and xmpp server will not get an immediate update of such a disconnection of the client sessions.


"Uptime"

This command takes no arguments, Internally its a linux "uptime" but returns the time in hours so that you can have in idea of RBox being online for so many hours.


"Hostname [hostname]"

This command takes an optional argument, when you pass this argument, it will be set as new hostname and effect is seen after next reboot, its a persistent property, once saved will remain there till you change it. When no argument is passed, it prints out the current hostname string. It is always helpful to access your device with a hostname rather than the ip.
Hint: use this command when your master and slave devices are connected on the same local network. sometimes you might be required to login to Rbox via ssh, and this hostname helps in such cases.


"Resethostname"

This command takes not arguments. When RBox is started with freshly created SDCard Image, there is no hostname on first boot. Use this command to reset the hostname to default which will look like "brbox-1A2B3C4D5E6F"(last 12 characters are the MAC ID of your hardware). After running this command, reboot is needed for changes to take effect.
Hint: when you are not sure about deciding a correct hostname, just use this command to reset to default hostname.


"Publicip"

This command takes no arguments. In case of missing Dynamic DNS setup for accessing your home network, deploy the RBox behind your firewall and use this command to know which public ip was assigned to your router by the provider. For any reason, if your home router is unable to register new public IP with Dynamic DNS server, this command comes in handy. Knowing the public ip of your home network is of no use if you have not prepared your router with open ports and NAT assignment.


"Localip"

This command takes no arguments. If you want to do ssh access to RBox which is on your local network and you want to access it using  ip-address, then use this command to know the ip of RBox.


"Gpio [address] [value]"


This command takes "address" as mandatory argument, and optional "value" argument. Us this command to read/write gpio pins of Raspi or Beaglebone. e.g: if you want make GPIO2 High on P1 header of Raspi, run "Gpio 2 0". To make it low, run "Gpio 2 1". To read the current status of GPIO2, run "Gpio 2".
Note: after reboot of RBox, last written pin values are not retained, they will revert back to defaults.


RBox - A Lightweight Linux system for IoT

Update(18.11.2016): Raspi image provided here works only on Raspberry pi B+ 

RBox is an acronym for RemoteBox which is a light weight linux system specifically designed to address the connectivity challenges of IoT devices on public internet. Some of the key features of Rbox are as listed below.
  1. Runs on low cost opensource h/w like Raspberry Pi B+, BeagleboneBlack and BeagleboneGreen.
  2. Less than 20Mb of update-binary image for Raspi and less than 10Mb of update-binary for beaglebone.
  3. Provides an easy way of online update to latest Rbox version from a remote location and without having to remove SDCard, It uses a dual-boot mechanism for fail-safe linux upgrade against power-outage or network-failure.
  4. Keeps your Raspi or Beaglebone always accessible via xmpp chat server on public internet.
  5. Xmpp chat messages will allow you to remotely read/write GPIO pins of Raspi or Beaglebone.
  6. Provides basic set of commands to monitor the health status of Rbox.
  7. Lets you connect Huawei E173 GSM modem to usb port of raspi or beagle, and provides basic set of sim management commands like read-sms,send-sms, delete-sms, dial-ussd-code and voice-dialling(for the moment its dialing only, no GSM-to-voip bridging).
  8. Open source project hosted on Gighub


What are the Applications of RBox?

Although RBox is in early stage of the development, there could be many use cases where it can be deployed for remote asset management. As of now, I came across following use cases where RBox can be useful.
  1. Home Automation
  2. Remotely Deployed GSM SIM Management.


How to deploy RBox on Raspberry Pi B or B+?

  1. First and foremost is to have two xmpp login accounts on publicly available jabber servers(So far RBox has been tested with jabber.de/xabber.de and ubuntu-jabber.de). Follow my previous Post on how to create master and slave xmpp accounts(ensure that master/slave accounts have authorized each other to send/receive messages).
  2. Download the initial SDCard Image from here.
  3. Unzip the downloaded xz image using 7zip or your favorite decompression tool.
  4. Write the unzipped binary image to Sdcard using Win32DiskImager
  5. After writing the image to SDCard, remove and re-insert the card on your PC. Your PC will detect a new drive as "boot" where raspi's kernel and boot images are listed.
  6. In this "boot" drive, create a new file called xmpp-login.txt and copy this text. After copy, edit this file and replace sample user and password with actual username and password of your slave-device which you created in Step-1.
  7. Remove the SDCard from PC, and insert it into Raspberry Pi, connect network cable and power it ON(ensure that your LAN has internet connectivity).
  8. On your android phone, open xabber app and login using master's username and password which you created in Step-1.
  9. If everything goes well, raspi will show up as online on your xabber client.
  10. Send a "Help" to your raspi-slave, it will reply with list of available commands.
  11. Send "Sysupdate;reboot" and wait for raspi to update to latest RBox image, after update, it will reboot and be back online again with latest RBox version. Here is the detailed information on all available commands.

Please note that RBox is in its initial development phase, so far i am a lone contributor to this project, hopefully it will get better as more contributors join. Let me know in comments section if you are facing any problems.

In the coming days, I would be posting information on "How to deploy RBox for Beagleboneblack/green".


Xmpp Account Creation

Update: If you happen have two google accounts, just make these to accounts known to each other by authorizing the contact and use one account for yourself and second account for your chat-bot(in google's security settings of the second account, set "Allow less secure apps: ON").


This guide will help you to create an xmpp master and slave accounts on public xmpp server (tested servers: xabber.de/jabber.de/ubuntu-jabber.de)

Why xmpp master/slave account creation:
Xmpp has been widely used as a chat-client between humans, The technique explained here uses Xmpp protocol for remotely accessing and controlling the embedded devices over the public internet. Xmpp was chosen because of its wide adaption, security and ease of connectivity reasons.

Typical client-server communication over the public internet requires special setup as server's firewall needs to expose its port and the same has to be accessible via domain name which requires special dynamic-dns registration process. This is the typical use case for home routers or 3g-data-connected-phones which are provided with non-static public ip by the provider. Solutions discussed here is an attempt to overcome these connectivity challenges by using existing xmpp public chat server infrastructure for IoT stuff.

In this scenario, Master account is for a person who wants to control his/her slave-device from a smart-phone or PC(e.g, xabber android app or psi pc client), whereas slave-device, typically a remotely deployed Linux machine(raspberry pi, beaglebone,etc...) acts as a chat bot using slave-xmpp-account. As long as Master and Slave devices are connected to internet, they can communicate to each other irrespective of their deployed location on earth.

Ok lets get started!!

1)Install Psi xmpp client on your windows machine
2)Start Psi, General==>Account Setup


3)click on Add


4)As shown in the picture below, follow 1 and 2

5)Enter public server as xabber.de and click on Next


6)After pressing "Next" it might take a while.. and then next box pops up
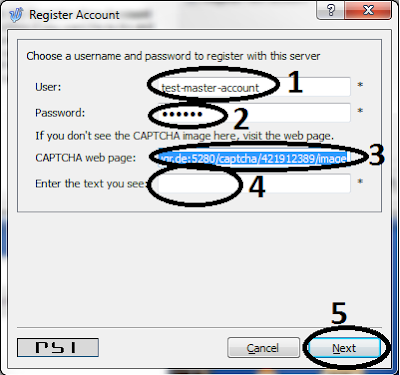
7)Field-1 shows username(in your case, choose a different username of choice)
8)Enter your own password as shown in Field-2
9)Open the Captcha link of Field-3 in a browser and the number shown by browser should be entered in Field-4
10)click "Next"


11)If everything goes well, then you will see following dialog box, Click on "Ok"


12)A new box pops up as shown below, just click "Save"


13)Next box pops up as shown below, just click "OK"


14)As shown below Go back to Psi main window, right-click on "master" entry ==> Status==>Online


15)Next window pops up as shown below(Enter, fullname/Nickname as shown in Field-1, and click "close")


16)Account creation for Master is done, now logout by right-clicking on "Master" entry ==>Status==>Offline (as shown below)


17)Repeat steps 1 to 15 for Slave account creation, pay attention at Step-4 and use string "Slave" and at step 7 and 8 use different username and password for slave. In step 15, use "Slave" as Full Name and Nickname.

18)Once the master and slave accounts are created, click on General==>AccountSetup and click on both the check-boxes of Master and Slave Accounts and Click Close button as shown below.


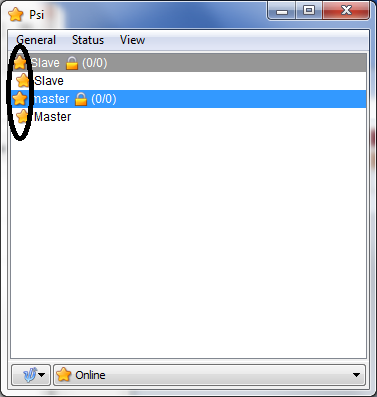
19)right click on "Slave" ==>Status ==>Online (wait for grey colored star to change its color to yellow, have patience, it might take some time), repeat the same for "Master", if everything goes well, you should see following box where both the master and slave stars are turned into yellow indicating as online.


20)After creation of master and slave accounts, its now time to pair them to allow sending and receiving messages to each other. Its an authorization process defined by the xmpp standard to block unsolicited messages being sent without prior agreement between the chat clients.

21)before proceeding with next section, it is important to ensure that master and slave chat clients are able to send/receive messages(try some hi/hello messages between with master/slave clients to see if message can be sent/received at both ends)

22)what next? proceed to my next blog about Rbox - A Lightweight Linux system for IoT.